Brief Explanation of Inflatable Tent Houses
Let’s dive into the fascinating world of inflatable tent houses! Picture this: a portable, lightweight shelter that can be set up in a matter of minutes with the help of air-filled tubes.
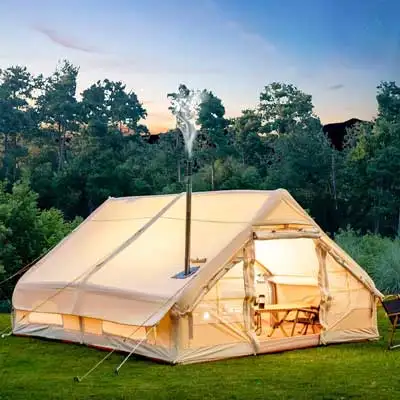
Inflatable tent houses are gaining popularity among outdoor enthusiasts, campers, and even event organizers due to their convenience and versatility. These tents are typically made from durable materials such as polyester or nylon, with built-in air chambers that replace traditional poles.
By simply inflating these tubes using an air pump, you can erect a sturdy and functional living space. The design ranges from simple dome-shaped tents to more complex structures with multiple rooms and compartments.
Importance of Setting Up the Tent Properly for Maximum Functionality and Safety
Now, you might be thinking, “Why does it matter how I set up my inflatable tent? Can’t I just blow it up and call it a day?” Well, my friend, let me tell you why setting up your tent properly is crucial for both functionality and safety. Firstly, when properly pitched, an inflatable tent house offers maximum usability.
Every component has been carefully designed to provide adequate living space while optimizing ventilation and natural light. Setting it up correctly ensures that all features function as intended – from the entrances to windows and compartments – allowing you to enjoy your camping experience without any hassles.
Moreover, safety is paramount when venturing into the great outdoors. A properly erected inflatable tent house guarantees stability even in inclement weather conditions.
By securing it firmly to the ground using stakes or weights and tightening guy ropes for added support against strong winds or sudden gusts, you can rest assured knowing your temporary haven won’t collapse on top of you during those unpredictable camping escapades. So remember: taking the time to set up your inflatable tent house correctly not only enhances its functionality but also guarantees your safety and peace of mind while embracing the great outdoors.
Choosing a Suitable Location
Location, Location, Location! When it comes to setting up your inflatable tent house, choosing the right spot is crucial for a successful camping experience. Picture this: a serene camping ground amidst nature’s paradise. Now imagine setting up your tent on an uneven or rocky terrain—it’s definitely not the ideal scenario.
So, before you embark on this adventure, scout for level ground free from sharp objects or debris that could potentially damage your inflatable tent. Avoid the Bumpy Ride: The last thing you want is to spend hours inflating your tent only to discover that the ground beneath it feels like an impromptu rollercoaster ride.
So, take a moment to find an area with smooth terrain—free from pebbles and protruding roots—that will provide a stable base for your inflatable abode. But hold on!
Our quest for the perfect location doesn’t end there. Breeze Control: Nature has its own whimsical ways of surprising us with unexpected gusts of wind.
To prevent your inflatable tent house from becoming an airborne spectacle, consider wind direction when selecting your spot. Positioning the entrance away from prevailing winds can help maintain a calm and comfortable atmosphere within the confines of your humble abode.
Gathering the Necessary Equipment
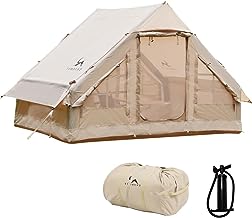
The Holy Grail: Before we dive into setting up our delightful dwelling, make sure you have all the necessary equipment at hand. The inflatable tent house kit should be at the top of your checklist; it typically includes all essential components like the tent itself (well, obviously), an air pump to breathe life into its veins, sturdy stakes for anchoring it firmly in place, and trusty ropes or guy lines to keep everything taut and secure.
Don’t Forget Your Toolbox: Beyond the inflatable tent house kit, consider additional tools that can come in handy during setup. A mallet or hammer, for instance, will aid in firmly securing the stakes into the ground.
This is particularly important if you’re camping on firm soil or rocky terrain where stakes might require a little extra persuasion. So don’t leave home without these trusty tools—they’ll make the setup process a breeze and ensure your tent stands tall against any unforeseen weather.
Unpacking and Laying Out the Tent Components
Identifying Different Parts (Main Body, Air Tubes, Entrance, etc.)
When you first unpack your inflatable tent house, it’s essential to become familiar with its various components. Lay out all the pieces on a clean and dry surface.
You’ll typically find the main body of the tent, separate air tubes or chambers, an entrance flap or door, and possibly additional accessories like windows or partitions. Take a moment to inspect each part carefully, ensuring there are no punctures or tears that could compromise the integrity of your shelter.
Ensuring All Components Are Undamaged and in Good Condition
Inspecting each component for any damage is crucial before proceeding further. Acme Toy Company suggests you check for any visible signs of wear and tear, such as small holes or weakened seams. Pay special attention to the air tubes as they are responsible for keeping your tent inflated.
Ensure there are no leaks or loose connections that may hinder proper inflation. Once you have thoroughly examined all parts and confirmed their good condition, you can proceed confidently to set up your inflatable tent house using an air pump.
Inflating the Tent Using an Air Pump
Connecting the Pump to the Designated Inflation Point(s)
Now that you have laid out all the components of your inflatable tent house, it’s time to bring it to life by inflating it. Locate the designated inflation point(s) on your tent – these are usually marked with clear indicators such as labels or symbols.
Attach your air pump securely to these points using their corresponding valves or adapters. Pro Tip: Some larger tents may feature multiple inflation points strategically placed for increased stability during windy conditions.
Make sure to connect each inflation point properly according to the manufacturer’s instructions. Note: To prevent any air leakage during the inflation process, ensure that all other openings, such as zippers or vents, are properly sealed.
Gradually Inflating Each Tube Section Evenly
With the air pump connected and ready to go, it’s time to start inflating your tent. Begin at one end of your tent and gradually inflate each tube section evenly.
This prevents any undue stress on specific areas and ensures a balanced inflation throughout the structure. Move from one tube section to another until you’ve reached the opposite end of your tent.
Important: Be cautious not to overinflate any section, as this can lead to damage or even bursting of the tubes. Monitoring the pressure gauge on your air pump (if available) or using a gentle touch can help prevent overinflation.
Securing the Inflated Tent to the Ground
Hammering Stakes through Designated Loops or Rings on the Base
Once your inflatable tent is fully inflated, it’s time to secure it firmly to the ground. Hammer stakes through designated loops or rings located on the base of your tent.
Ensure that each stake is firmly anchored into the ground, providing sufficient stability for your shelter. Pro Tip: If you’re setting up your inflatable tent house on softer ground like sand or soil, you may need additional weights like sandbags placed inside designated pockets along with securing stakes for added stability against wind or movement.
Tightening Guy Ropes for Added Stability in Windy Conditions
In windy conditions, tightening guy ropes can significantly enhance stability and prevent unwanted swaying or tipping of your inflatable tent house. Attach guy ropes securely to their respective points on your tent and extend them outwards at an angle away from its structure.
Stake these ropes into the ground using pegs and adjust their tension by pulling them taut. Remember: Properly tightened guy ropes provide additional resistance against strong gusts of wind, making your tent more secure and safe.
Conclusion
Setting up an inflatable tent house may initially seem like a daunting task, but by following a step-by-step guide and ensuring the proper handling of its components, you can easily create a sturdy and comfortable shelter. Taking the time to unpack and inspect your tent, inflating it gradually and evenly, as well as securely anchoring it to the ground are essential steps for an enjoyable camping experience. So go forth with confidence, embrace the adventure that lies ahead, and let your inflatable tent house be a beacon of comfort amidst nature’s embrace.

