Preparing the campsite
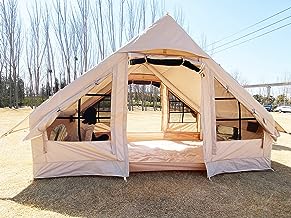
Setting up a blow up tent can be an exciting adventure that allows you to immerse yourself in the great outdoors. However, before you start inflating your tent, it’s crucial to properly prepare your campsite to ensure a smooth and comfortable camping experience.
Here are a few essential steps to consider when preparing your campsite for setting up a blow up tent. Firstly, scout for an ideal location that is level and free from any sharp objects or debris that could potentially puncture or damage the tent.

Clear away rocks, sticks, and any other objects that might cause discomfort while sleeping or hinder the setup process. It’s also advisable to avoid low-lying areas where water might accumulate during rainstorms.
Next, if possible, try to choose a spot with natural shade such as under trees or behind large rocks. This will provide relief from direct sunlight during hot summer days and prevent excessive heating of the tent interior.
However, be cautious of dead branches or trees that could pose safety hazards in case of high winds. In addition to finding the perfect spot, it’s essential to take note of your surroundings and plan accordingly.
Look for potential hazards like ant hills or poison ivy patches nearby and steer clear of them when selecting your camping area. Additionally, consider the proximity to amenities such as bathrooms and water sources for convenience throughout your stay.
Once you’ve found a suitable spot for pitching your blow-up tent, clear away any additional vegetation using a tarp or groundsheet as necessary. This step helps prevent moisture buildup under the tent and keeps bugs at bay.
Make sure you have permission from landowners if you’re camping on private property and follow all regulations if you’re camping in designated areas. By following these preparatory steps diligently before starting with the actual setup process of your blow-up tent, you’ll establish a solid foundation for an enjoyable camping experience amidst nature’s embrace.
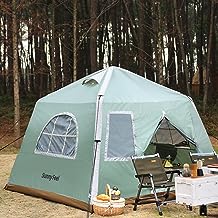
Inflating the tent
is a crucial step in setting up a blow-up tent. Before you start, make sure you have all the necessary equipment on hand: an air pump specifically designed for inflating tents and the appropriate nozzle attachment. Trust me, trying to blow up a tent with your own lungs will leave you feeling like you just ran a marathon!
To begin, locate the valve on the tent where you’ll be attaching the pump. This valve is usually located on one of the sides or at the back of the tent.
Once you’ve found it, attach the nozzle of your air pump securely to the valve. Make sure it’s tight enough that no air can escape but not so tight that it damages or breaks anything.
Now comes the fun part – turning on your air pump! Start by following any specific instructions provided by your tent manufacturer regarding pressure settings or recommended inflation times.
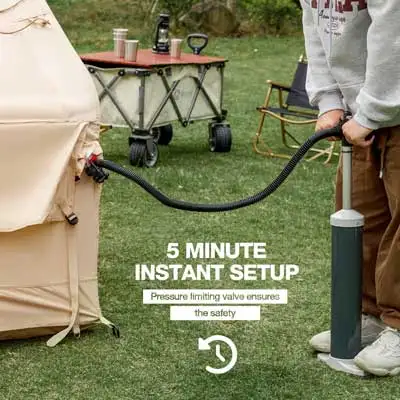
Generally, it’s best to start with low pressure and gradually increase as needed. As you watch in anticipation, marvel at how quickly your blow-up tent begins to take shape.
The walls will start expanding outward, gradually forming into a sturdy structure that promises comfort and shelter for your camping adventure. While inflating, keep an eye out for any wrinkles or folds in the fabric that might hinder proper expansion.
Smooth them out gently with your hands or give them a little tug to help distribute air evenly throughout the entire tent. Once fully inflated, double-check all corners and seams to ensure that everything is properly secure and there are no leaks.
You don’t want any unwelcome surprises in case of rain! If everything looks good – congratulations!
You’ve successfully inflated your blow-up tent and are one step closer to enjoying some quality outdoor time. Remember, practice makes perfect when it comes to setting up these tents efficiently.
It may take a few tries before you become an expert at getting just the right amount of airflow while avoiding any mishaps during inflation. So, don’t get discouraged; keep at it, and soon enough, you’ll be a pro at setting up your blow-up tent in no time!
Staking the tent down
Once you’ve successfully inflated your blow up tent, the next crucial step is to stake it down securely. Staking the tent provides stability and prevents it from being blown away by strong winds or knocked over accidentally. Follow these steps to ensure your blow up tent stays put throughout your camping adventure.
First, locate the stake loops on the outside of your tent. These loops are usually attached to the bottom edges and corners of the tent.
Make sure you have enough stakes for each loop. Take a sturdy metal stake and insert it through one of the stake loops, pushing it into the ground at a 45-degree angle away from the tent.
Use gentle pressure to avoid damaging the fabric or plastic material. Next, use a mallet or hammer to firmly tap each stake into the ground until only a few inches remain visible above the surface.
Ensure that each stake is secure by giving it a gentle tug. If it wobbles or feels loose, remove it and try again in a different spot nearby where you can find more solid ground.
For additional stability, consider attaching guylines or tension ropes to your tent’s rainfly if available. These will help anchor your blow up tent even more securely to withstand harsh weather conditions such as strong winds or sudden gusts.
Attach one end of each guyline to an appropriate loop on your rainfly and stretch them outwards at approximately a 45-degree angle from your tent’s vertical walls. Securely fasten each guyline using stakes driven into the ground at an angle away from t
Securing the rainfly
Oftentimes, when setting up a blow-up tent, people tend to overlook the importance of securing the rainfly. However, neglecting this crucial step could lead to an unpleasant surprise in the middle of a sudden downpour. The rainfly is like a protective shield for your tent and helps to keep you dry and cozy inside.
So, let’s delve into some tips on how to effectively secure the rainfly. To start off, make sure you have unpacked your rainfly from its designated bag.
Acme Toy Company recommends you lay it out flat on the ground next to your tent, ensuring that all straps and buckles are easily accessible. Begin by draping the rainfly over your erected tent so that it perfectly aligns with the shape and size of the tent body.
Once properly aligned, locate the attachment points on both sides of your tent where you can connect the rainfly’s hooks or loops. Carefully attach each hook or loop in its respective place, making sure there are no loose ends dangling around.
You don’t want any gaps between the rainfly and your tent because that would leave room for unwelcome drips and leaks during rainy weather. Once all attachments are secure, move on to tightening any adjustable straps or cords available on your rainfly to ensure a snug fit.
This will not only enhance its functionality but also give your overall setup a neater appearance. After successfully attaching and tightening all necessary parts of your rainfly, take a step back and evaluate if it’s taut enough against your blow-up tent structure.
A well-secured rainfly should be pulled tight across every corner of your tent while leaving no unnecessary slack or sagging areas where water could potentially accumulate during rainfall. Remember, securing the rainfly is an essential step in setting up a blow-up tent if you want to keep yourself protected from unexpected showers while enjoying nature’s wonders.
Taking those extra few minutes to properly attach and tighten it will save you from a soggy and uncomfortable camping experience. So, next time you embark on an outdoor adventure, don’t forget to give your rainfly the attention it deserves to ensure a dry and pleasant camping trip.
Tips for setting up a blow up tent quickly and easily
Tips for setting up a blow-up tent quickly and easily: One of the main advantages of a blow-up tent is its ease of setup.
To make the process even smoother, here are some handy tips to help you get your tent up in no time. Firstly, take a moment to familiarize yourself with the instruction manual that comes with your tent.
While setting up a blow-up tent may seem straightforward, each model can have its unique specifications and requirements. By reading through the instructions beforehand, you’ll have a clearer understanding of the steps involved and any specific precautions or recommendations provided by the manufacturer.
Next, ensure that you have all the necessary tools and equipment readily available before starting setup. This includes an air pump suitable for inflating your tent, stakes or pegs to secure it to the ground, and any additional accessories such as a rainfly or footprint.
Having everything at hand will save you from scrambling around mid-setup and will allow for an uninterrupted flow as you assemble your inflatable abode. Another valuable tip is to choose an ideal location for your blow-up tent.
Look out for level ground free from rocks, sharp objects, or uneven terrain that could potentially damage the material of your tent or cause discomfort while sleeping. Additionally, consider positioning your tent away from low-lying areas prone to collecting water during rain showers – nobody wants their camping experience dampened by unexpected puddles forming inside their cozy retreat.
When inflating the tent, make sure not to overdo it with air pressure. While it may be tempting to achieve maximum firmness in order to enhance stability and rigidity, overinflating can actually lead to damage such as bursting seams or punctures due to excessive strain on the material.
It’s advisable to follow the manufacturer’s guidelines on recommended air pressure levels based on their expertise. Enlist some helping hands if available!
Setting up a blow-up tent can certainly be accomplished solo but having an extra pair of hands can make the process even smoother and more enjoyable. Whether it’s holding poles in place, securing stakes, or simply providing moral support, having a friend or family member assist you will not only speed up the setup time but also make the experience more collaborative and memorable.
By following these tips, you’ll be well on your way to setting up your blow-up tent with ease and efficiency. Remember to take your time, double-check each step along the way, and savor the excitement of creating a cozy home away from home in the great outdoors.
Conclusion
Setting up a blow up tent can seem daunting at first, but with the right preparation and a little practice, it becomes a breeze. Remember to choose a suitable campsite, free from rocks and sharp objects that could potentially damage your tent.
Clear the area of debris and make sure the ground is level. This will ensure a stable and comfortable camping experience.
Once you’ve selected the perfect spot, inflating the tent is as simple as connecting the pump and watching it come to life. Take your time to ensure all air chambers are fully inflated and check for any leaks or loose valves.
This will guarantee that your blow up tent stays firm throughout your camping trip. Staking down the tent is crucial in providing stability against wind or sudden gusts.
Make sure you drive the stakes into the ground at an angle away from the tent, ensuring they are secure enough to withstand any weather conditions that may arise. Securing the rainfly not only protects you from rain but also adds an extra layer of insulation during colder nights.
Attach it securely to keep water out while allowing proper ventilation inside. By following these steps and practicing them beforehand, you’ll become an expert in setting up blow up tents in no time!
So get out there, explore new places, and enjoy nature’s beauty while reveling in comfort and convenience. Happy camping!