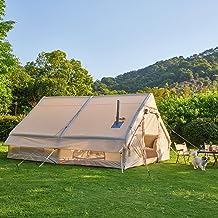
A step-by-step guide on how to set up a blow up tent house, including how to inflate the tent, stake it down, and secure the doors and windows
Setting up a blow up tent house can be an exciting and fun adventure, but it’s important to do it right to ensure a comfortable and secure camping experience. In this step-by-step guide, we will cover the process from start to finish, including how to properly inflate the tent, stake it down securely, and secure the doors and windows.
The first step in setting up your blow up tent house is inflating the tent. Most blow up tents come with an air pump that easily connects to the tent valves.
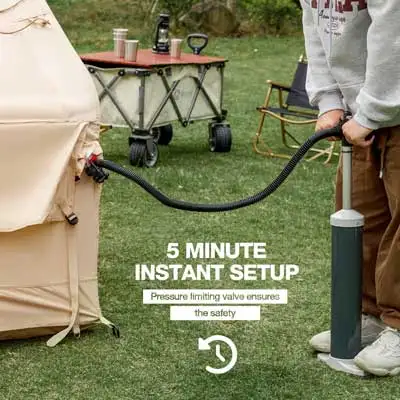
Start by locating the valves on your tent – they are usually found near the bottom of each inflatable chamber. Open the valves by twisting them counterclockwise.
Now it’s time to connect your air pump to the valves. Make sure you have a fully charged battery or access to electricity if you’re using an electric pump.
Insert the pump nozzle into one of the valves and turn on the pump. The inflatable chambers will start filling with air, slowly expanding as they inflate.
Be patient during this process and make sure each chamber is fully inflated before moving on to the next one. Once all chambers are inflated, close and tighten each valve by twisting them clockwise.
Next comes staking down your blow up tent house for added stability. Locate the anchor points or loops at each corner of your tent – these are typically found at ground level or slightly above it.
Take sturdy stakes and insert them through these loops at a 45-degree angle into the ground, ensuring that they are firmly secured. To further secure your tent, use guylines provided with your blow up tent kit or tie-down straps if not already attached.
Attach one end of these lines or straps to designated points on your tent (usually located near corners) using secure knots like a square knot or bowline knot. Extend them outward from your tent and stake them down using additional stakes at approximately a 45-degree angle away from your tent.
To ensure privacy and keep unwanted critters out, it’s vital to secure the doors and windows of your tent house properly. Most blow up tents have zippers for doors and windows.
Start by closing all zippers completely. Then, starting from the bottom, zip them up firmly using both hands to ensure a smooth motion.
Acme Toy Company suggests you check for any gaps or openings and adjust accordingly. By following these step-by-step instructions on inflating the tent, staking it down securely, and properly securing the doors and windows of your blow up tent house, you will be well on your way to creating a comfortable and safe camping haven in no time!
Tips for troubleshooting common problems when setting up a blow up tent house
When it comes to setting up a blow up tent house, it’s not uncommon to encounter a few hiccups along the way. However, with a little bit of troubleshooting know-how, you can easily overcome these common problems and ensure a smooth setup process. One of the most common issues that people face is getting the tent properly inflated.
If you find that your tent is not fully inflating or seems to be losing air quickly, here are a few things you can try. First, check all the valves and make sure they are securely closed.
Sometimes, a slightly loose valve can cause air leakage. Next, inspect the seams of the tent for any signs of damage or leaks.
If you spot any tears or holes, use a patch kit to seal them up. Additionally, ensure that your air pump is functioning correctly and providing sufficient pressure.
If all else fails, it might be worth reaching out to the manufacturer for guidance or checking online forums for troubleshooting tips specific to your tent model. Another challenge that may arise during setup is getting your blow up tent house properly aligned and stable on the ground.
It’s essential to stake down your tent securely so that it doesn’t get blown away by strong winds or collapse under its weight when occupied. Begin by selecting suitable ground stakes based on the terrain you’re setting up on; longer stakes are best for softer ground like grass while shorter ones work well on hard surfaces like concrete.
Insert them at an angle away from the tent at each anchor point provided by the manufacturer. If you encounter resistance while driving in stakes due to rocky soil or hard surfaces, try using additional tools like mallets or rock pegs designed for such conditions.
Once all stakes are in place, make sure they’re firmly embedded into the ground by giving them a gentle tug – they should hold their position without wiggling too much. By following these troubleshooting tips and having patience when faced with challenges during setup, you’ll be able to conquer any obstacles and enjoy your blow up tent house in no time.
Remember, practice makes perfect, so don’t be discouraged if it takes a couple of tries to get everything just right. Happy camping!
Photos and illustrations that show each step of the setup process
Now let’s dive into the exciting part – the step-by-step breakdown of setting up your blow up tent house, complete with helpful photos and illustrations to guide you along the way. Get ready for an adventure! Step 1: Unpack and Lay Out
Once you’ve found your ideal spot for pitching your blow up tent house, start by unpacking it from its storage bag. Lay out the tent fabric on the ground, ensuring that it is free from sharp objects or debris that could potentially damage it.
Smooth out any wrinkles or folds to ensure a neat setup. Step 2: Inflate It Up
This is where things get fascinating! Locate the air pump that comes with your blow up tent house.
Connect one end of the pump to the designated valve on your tent fabric and secure it tightly. Power on the pump and watch as your humble pile of fabric transforms into a magnificent living space right before your eyes.
Keep an eye on the pressure gauge; once it reaches the recommended level specified by the manufacturer, switch off the pump. Step 3: Stake It Down
To ensure stability in various weather conditions, grab those sturdy stakes (usually included with your blow up tent house) and secure them through the designated loops or rings at each corner of your inflated structure. Make sure they are firmly anchored into the ground, preventing any unexpected gusts of wind from whisking away your temporary abode.
Step 4: Secure Doors and Windows With most blow-up tent houses, you’ll find zippers or hook-and-loop fasteners used to secure doors and windows.
Starting with each door, ensure they are fully closed before engaging whatever fastening mechanism is provided. This helps maintain privacy while keeping pesky bugs outside where they belong.
When securing windows, make sure they are sealed tightly to prevent drafts or rain from finding their way inside. There you have it – four crucial steps to successfully setting up a blow-up tent house.
Each step is simpler than it seems, especially when accompanied by visual aids that provide a clear understanding of the process. So, strap on your adventure boots and get ready to enjoy the great outdoors in the comfort of your inflatable sanctuary!
Conclusion
Setting up a blow up tent house may seem daunting at first, but with the right guidance and a little practice, it can become a breeze. By following the five easy steps outlined in this article, you will be able to enjoy the convenience and comfort of your inflatable abode in no time.
Remember, when inflating the tent, take your time and ensure that all valves are properly closed before starting. Use an electric pump or hand pump to avoid overinflating the tent.
Once inflated, make sure to stake it down securely using sturdy stakes and guy lines provided. This will prevent any mishaps during windy conditions.
Securing the doors and windows is crucial for maintaining privacy and keeping bugs out. Ensure that zippers are fully closed and use any additional clips or straps provided to secure them tightly.
Take advantage of the ventilation options available by adjusting window flaps accordingly. Make sure all seams are properly sealed to prevent any leaks during rain showers.
Setting up a blow up tent house can be an enjoyable experience with these simple steps at your disposal. Embrace the freedom of portable accommodation while camping or hosting outdoor events without compromising on comfort.
So go ahead and embark on your next adventure knowing that you possess the skills to set up your own haven wherever you desire. Happy camping!


